
In this article, we will introduce how to deploy JSS apps. We will use the previous JSS app and an instance of Sitecore to publish the site using Node.js application hosting.
Prerequisite.
The Sitecore instance is set up as a virtual machine so that JSS applications can access Sitecore through the Internet. It is also assumed that API keys, etc. have already been created and that the server can be referenced by FQDN.
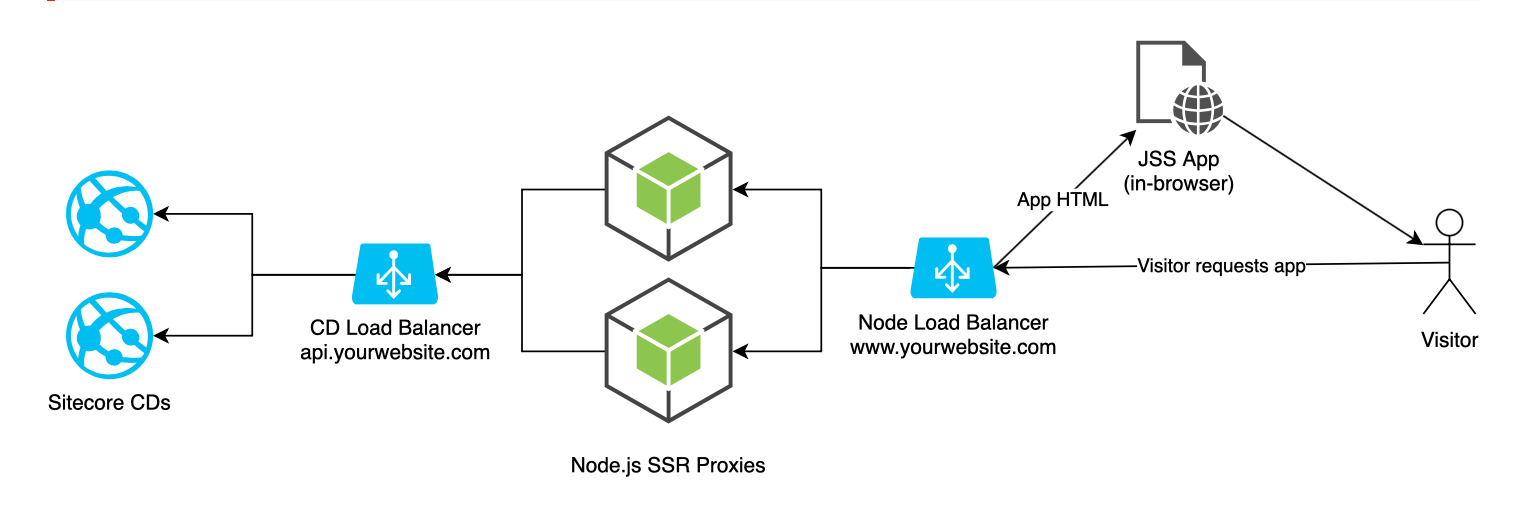
It also introduces the Headless topology.
- Reference: Server-side rendering JSS applications
On the right is the visitor, who accesses the Node.js instance. This Node.js instance accesses the Sitecore CD on the left side to retrieve the necessary information. The Node.js instance that obtains the necessary information responds and the page is displayed in the browser.
Check the environment on the Sitecore side
Check site settings
Strictly speaking, the host name must be specified, but since this is a verification, we will specify * for the host name. The host name setting corresponds to the host name item in the item /sitecore/content/demo/react-app/Settings/Site Grouping/react-app.

Verify and publish API keys
If the field for the fake user accessible by API key is left blank, enter extranet\anonymous.

If an update is made, the corresponding item is published.
Site Publication
We have been synchronizing items and checking page views, etc., but the data is stored in the Master database and we need to publish the site so that it can actually be viewed from the outside.
To publish the relevant items, work as follows
- Select items from the JSS site
- Right-click and click Publish Item

- Check the sub-items and related items, and select the target language to publish as well.

Confirm that you can access the site as a result of the above.

Sitecore is now ready.
Creating a Headless SSR Project
To create a Node.js for delivery, create a new project. The template name will be node-headless-ssr-proxy.
PowerShell
jss create react-app-cd node-headless-ssr-proxy
Of the files in the project you have created, write the settings in the config.js file. The first step is to specify the name of the application.
JavaScript
let appName = process.env.SITECORE_JSS_APP_NAME;Here.
JavaScript
let appName = process.env.SITECORE_JSS_APP_NAME || `react-app`;followed by the default value. Then the server name configuration item
JavaScript
const apiHost = process.env.SITECORE_API_HOST || 'http://my.sitecore.host'Change the server name behind to the name of the server you are using; if you are using https, you must start with https. Finally, add your API key to the
JavaScript
apiKey: process.env.SITECORE_API_KEY || serverBundle.apiKey || '{YOUR API KEY HERE}',Set the language to "en". To switch the default content, change the language in the following one line from en to ja-JP.
JavaScript
const language = layoutServiceData.sitecore.context.language || 'ja-JP';This completes the configuration for config.js.
Copy of build file
Run build again on the original react-app project (if nothing has changed since the last time and you have a build folder, you are good to go). Copy its contents into the newly created react-app-cd project by creating dist/react-app.
The directory is shown in the figure below.

Operation check
Once the above settings have been completed, check the operation in the environment at hand.
PowerShell
npm run startAs soon as you run it, you will see the following message.

Access http://localhost:3000 as it is a form of accessing the local 3000 number

Summary
We have now completed the operation check. In the next issue, we would like to expand this project to various platforms.
- Headless SSR - Part.1
- Headless SSR - Part.2
- Headless SSR - Part.3