
We have created the project multiple times so far, but it is tedious to perform the same thing each time. Therefore, we will introduce a procedure to start the environment without the previous steps.
Creating a GitHub repository
Access the following repository and click the Use this template button to create a new repository.

When creating a repository, you can also choose to create a Private repository. Please change the name and other information as you wish to use it.

The created repository is ready to be deployed locally.
Project Settings
First, create an .env file by copying the .env.example file. Then, for the administrator's password, change the SitecoreAdminPassword in the init.ps1 file.
After completing the above settings, execute the following commands in an environment where you have administrative privileges. Please change the location of the license file to match the environment at hand.
PowerShell
.\init.ps1 -LicenseXmlPath "C:\projects\license\license.xml"
Running the above script will automate the steps of creating locally available certificates, updating localhost, etc.
Finally, to list the Node.js version in the .env file, run the command node -v and set the displayed version to NODEJS_VERSION to complete the preparation.

Execute the process up to startup
Now that the above preparations have been made, the following command will automatically build the container, start Sitecore, and import everything. You do not need administrator privileges to run this script.
PowerShell
.\up.ps1The first time you start Sitecore, it will take some time, including downloading the container image, etc. As soon as Sitecore starts, it will ask you to log in. This login is required to access the environment from the Sitecore CLI, so please log in.

Operation check
When the script has completed its operation, the administration screen will appear as shown below.

Since Japanese resources are also imported, switching the language on the administration screen will switch to Japanese notation.

Start the content editor, select the item `/sitecore/content/sitecoredemo-jp/home`, start the experience editor, and the page editing screen will appear.

Additional Procedures
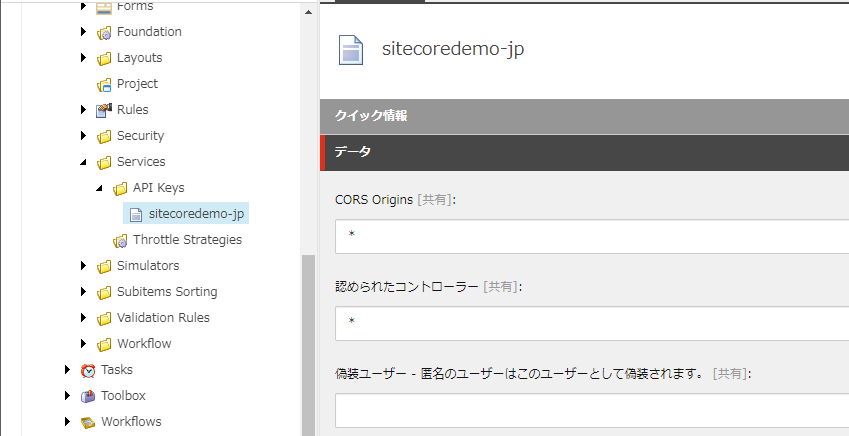
This project does not issue API keys. Therefore, please create an API key and publish it. Go to the path /sitecore/system/Settings/Services/API Keys and create an API key. Set the item CORS Origins and Authorized Controllers to *.

Perform item publication (publish).
After publishing, access the GraphQL screen at the following URL (change the hostname if you have changed it)
- https://cm.sitecoredemo.localhost/sitecore/api/graph/edge/ui
Set the API key in the lower left HTTP HEADERS as follows
JSON
{
    "sc_apikey": "your api key"
}
If you see a screen like the one below, you can now use GraphQL.

Set the created API key in the .env file. Please also include the key in src\rendering\.env so that it can be used in your local Next.js project.
Suspension and Resumption
Once data import has been performed, the following steps can be used to control container startup. The command to stop the container is as follows
PowerShell
docker compose stopTo terminate the container, use the following command.
PowerShell
docker compose downTo start, use the following command.
PowerShell
docker compose up -dExecute the above commands according to the situation when you make changes to the settings.
Deletion of data
To restore the environment to its initial state once it has been created, run docker\clean.ps1. All database files and other files will be deleted. After that, importing items, etc., will be performed as follows.
PowerShell
docker-compose up -d
dotnet sitecore login --cm https://cm.sitecoredemo.localhost --auth https://id.sitecoredemo.localhost --allow-write true -n default
dotnet sitecore index schema-populate
dotnet sitecore ser push
This will return the project to its initial state.
Summary
I thought I could include many tips as a blog post and have introduced the steps to create a project so far, but it is hard to do the same process every time. By creating a base project like this, you can quickly prepare your development environment. By understanding the steps, you will be able to quickly identify changes if you want to make some changes.