
Starting with Sitecore Experience Platform 10.0, Docker support has become standard. In this article, we will show you how to run Sitecore Experience Platform 10.0 with Docker.
- Docker-related articles are summarized in Docker.
Prerequisite
To create a demo environment, we will use the following software. The editor can be set up as you like, but here we will install Visual Studio Code.
- Windows Server 2019
- Chocolatey
- Visual Studio Code
- Git for Windows
- Docker Desktop
Windows Server 2019 Setup
For this environment, we prepared a virtual machine that can use Docker to start up on Microsoft Azure. The instance used this time is Standard D8s v3 (8 vcpu, 32 GiB memory). We have already translated the administration screen into Japanese so that it is easy to refer to the explanation.
Change the security of the server in Windows Server 2019 so that files can be downloaded and installed from the Internet. Select Server Manager, specify local server, and with respect to administrators, turn off the Internet Explorer security feature to allow downloading.

When Internet Explorer is launched, a dialog box appears regarding the protected mode.

Turn it on here. Make sure that Google Chrome has been downloaded and installed in this state.
Enabling Hyper-V
Docker uses Hyper-V when using Windows containers. For this reason, Hyper-V must be enabled. To do so, launch the Server Manager and enable Hyper-V and containers.

In order to enable Hyper-V, the machine must be rebooted, so we will reboot it once and continue with the rest of this section.
Installing Choco
Install Chocolatey, a package management tool, as it is useful for installing various software.
Click the Install Now button in the upper right corner of the page to display the script. Running the script with PowerShell administrative privileges will complete the installation.
After the installation is complete, first install Git and vscode.
PowerShell
choco install git
choco install vscode
As for VS Code, it is useful to install an additional Japanese UI.
Docker Desktop
Docker Desktop can also be installed from the command line.
PowerShell
choco install docker-desktop
The installation will install the required components and prompt for a reboot if necessary (the following steps require a reboot).

Once logged in, you will see docker running in the task tray in the lower right corner.

Right-click on the icon to switch to the Windows container.

A dialog box appears as shown below to switch between the two.

Install the Sitecore Docker Tool
A useful tool to assist with installation is the Sitecore Docker Tools, which can be downloaded from the Sitecore Gallery and installed by executing the following commands.
PowerShell
Register-PSRepository -Name "SitecoreGallery" -SourceLocation "https://sitecore.myget.org/F/sc-powershell/api/v2"
Install-Module SitecoreDockerTools
When confirmation comes at the command prompt, use Y or A to proceed.

Start preparing for installation
After all the tools have been prepared, we will proceed with the installation while using the tools.
Prepare package for deployment
For the deployment package required for installation, download the Container Deployment Package from the Sitecore Experience Platform 10.0 site.

The file name downloaded this time is SitecoreContainerDeployment.10.0.0.004346.184.zip. This file was unzipped to c:\projects and the folder structure is as follows.

Two folders are prepared in the folder: the compose folder and the k8s folder. In this case, we will use ltsc2019 - xp0 in the compose folder since we only want to run it at hand.
Prepare license file
Prepare the sitecore license file. This time, copy the file to the folder c:\projects created above.

Environment setting
In order to deploy xp0, we will work in the c:\projects\compose\ltsc2019\xp0 folder.
This folder contains only the .env file and docker-compose.yml file. In order to create the Sitecore environment to be launched this time, we will set the values in the .env file.
If you check the file, you will see the following
Plain Text
COMPOSE_PROJECT_NAME=sitecore-xp0
SITECORE_DOCKER_REGISTRY=scr.sitecore.com/sxp/
SITECORE_VERSION=10.0.0-ltsc2019
SITECORE_ADMIN_PASSWORD=
SQL_SA_PASSWORD=
TELERIK_ENCRYPTION_KEY=
SITECORE_IDSECRET=
SITECORE_ID_CERTIFICATE=
SITECORE_ID_CERTIFICATE_PASSWORD=
SITECORE_LICENSE=
CM_HOST=xp0cm.localhost
ID_HOST=xp0id.localhost
TRAEFIK_IMAGE=traefik:v2.2.0-windowsservercore-1809
TRAEFIK_ISOLATION=hyperv
ISOLATION=default
The project name is sitecore-xp0 and the Docker registry is the image provided by Sitecore. The standard parameters are set, but you will need to fill in the blanks.
Parameter | Value |
|---|---|
COMPOSE_PROJECT_NAME | sitecore-xp0 |
SITECORE_DOCKER_REGISTRY | scr.sitecore.com/sxp/ |
SITECORE_VERSION | 10.0.0-ltsc2019 |
SITECORE_ADMIN_PASSWORD | |
SQL_SA_PASSWORD | |
TELERIK_ENCRYPTION_KEY | |
SITECORE_IDSECRET | |
SITECORE_ID_CERTIFICATE | |
SITECORE_ID_CERTIFICATE_PASSWORD | |
SITECORE_LICENSE | |
CM_HOST | xp0cm.localhost |
ID_HOST | xp0id.localhost |
TRAEFIK_IMAGE | traefik:v2.2.0-windowsservercore-1809 |
TRAEFIK_ISOLATION | hyperv |
ISOLATION | default |
SITECORE_ADMIN_PASSWORD
Set a password to be used by the Sitecore administrator. For this reason, please set a password that is used by a general administrator.
SQL_SA_PASSWORD
Set the password that SQL Server will use. In this case, we will use a tool to set the password.
PowerShell
Set-DockerComposeEnvFileVariable "SQL_SA_PASSWORD" -Value (Get-SitecoreRandomString 19 -DisallowSpecial -EnforceComplexity)
Executing the above command in PowerShell will set the password to SQL_SA_PASSWORD.
TELERIK_ENCRYPTION_KEY
A random string of 64 to 128 characters must be set here. The tool will automatically set this up as well.
PowerShell
Set-DockerComposeEnvFileVariable "TELERIK_ENCRYPTION_KEY" -Value (Get-SitecoreRandomString 128)
Configuration for Identity Server
The following three items must be configured for the Identity Server to log in.
- SITECORE_IDSECRET : Random string of 64 characters
- SITECORE_ID_CERTIFICATE :
- SITECORE_ID_CERTIFICATE_PASSWORD
This can also be configured by executing the same command as above. In this case, we will work with a domain name of localhost, so we will create it as follows
PowerShell
Set-DockerComposeEnvFileVariable "SITECORE_IDSECRET" -Value (Get-SitecoreRandomString 64 -DisallowSpecial)

$idCertPassword = Get-SitecoreRandomString 8 -DisallowSpecial
Set-DockerComposeEnvFileVariable "SITECORE_ID_CERTIFICATE" -Value (Get-SitecoreCertificateAsBase64String -DnsName "localhost" -Password (ConvertTo-SecureString -String $idCertPassword -Force -AsPlainText))

Set-DockerComposeEnvFileVariable "SITECORE_ID_CERTIFICATE_PASSWORD" -Value $idCertPassword
Having proceeded this far, the only item remaining is the license.

SITECORE_LICENSE
The license file is used to define this environment variable. This can also be easily configured by using the tool.
PowerShell
Set-DockerComposeEnvFileVariable "SITECORE_LICENSE" -Value (ConvertTo-CompressedBase64String -Path "C:\projects\license.xml")
Host name
This time, the host name is XP0, so the configuration is simple: one CM and one Identity Server. This time, we will proceed with this name as originally described.
Plain Text
CM_HOST=xp0cm.localhost
ID_HOST=xp0id.localhost
Note that the above host must be locally identifiable, so it must be written on localhost. The process is completed by executing the following two lines in PowerShell.
PowerShell
Add-HostsEntry "xp0cm.localhost"
Add-HostsEntry "xp0id.localhost"
The preparation is complete in the form that all have been executed and the parameters have been filled in.

Certificate Preparation
Since https communication is the standard for Sitecore, a certificate must be prepared. In this case, we are working with a domain name of localhost, so we will create a self-certificate.
First, download mkcert.ext as a tool to create certificates
- Access to https://github.com/FiloSottile/mkcert/releases/
- Download the Windows tool (in this case mkcert-v1.4.3-windows-amd64.exe )
- Rename the file to mkcert.exe and copy it to C:\projects\compose\ltsc2019\xp0\traefik
- Open the properties of mkcert.exe, check the security items listed at the bottom of the dialog and allow them to be used

- Run mkcert -install and click Yes on the dialog

You are now ready to go. Now we will use this tool to create the client authentication and key files needed to set up the certificate.
PowerShell
.\mkcert -cert-file certs\xp0cm.localhost.crt -key-file certs\xp0cm.localhost.key "xp0cm.localhost"
.\mkcert -cert-file certs\xp0id.localhost.crt -key-file certs\xp0id.localhost.key "xp0id.localhost"
After completing the above steps, the required files are created under certs.

In the folder C:\projects\compose\ltsc2019\xp0\traefik\config\dynamic, a file certs_config.yaml is prepared.
YAML
tls:
  certificates:
    - certFile: C:\etc\traefik\certs\xp0cm.localhost.crt
      keyFile: C:\etc\traefik\certs\xp0cm.localhost.key
    - certFile: C:\etc\traefik\certs\xp0id.localhost.crt
      keyFile: C:\etc\traefik\certs\xp0id.localhost.key
Since the file name is the same as the file name of the certificate file we are creating, we will proceed as is.
Launch Sitecore using containers
C:\projects\compose\ltsc2019\xp0\ のフォルダに移動をして、以下のコマンドを実行してください。
PowerShell
docker-compose up -d
The image will begin downloading according to the definitions in the docker-compose.yml file. The first time, this download and deployment will take some time. After the download is complete, the container is deployed according to the definition.

VSCode Docker Extensions
It will take a while to install the Docker extension available in Visual Studio Code, search for Docker in Visual Studio Code extensions and the tool will appear.

After the installation is complete, a Docker icon will appear on the left side. Clicking this icon will allow you to browse and manipulate images and containers.

Access test
When the docker-compose process is actually finished, the following screen is displayed.

Browse to the Docker extension in Visual Studio Code and you will see the following screen

To access the actual server you are running on, access the following URL in your browser
- https://xp0cm.localhost
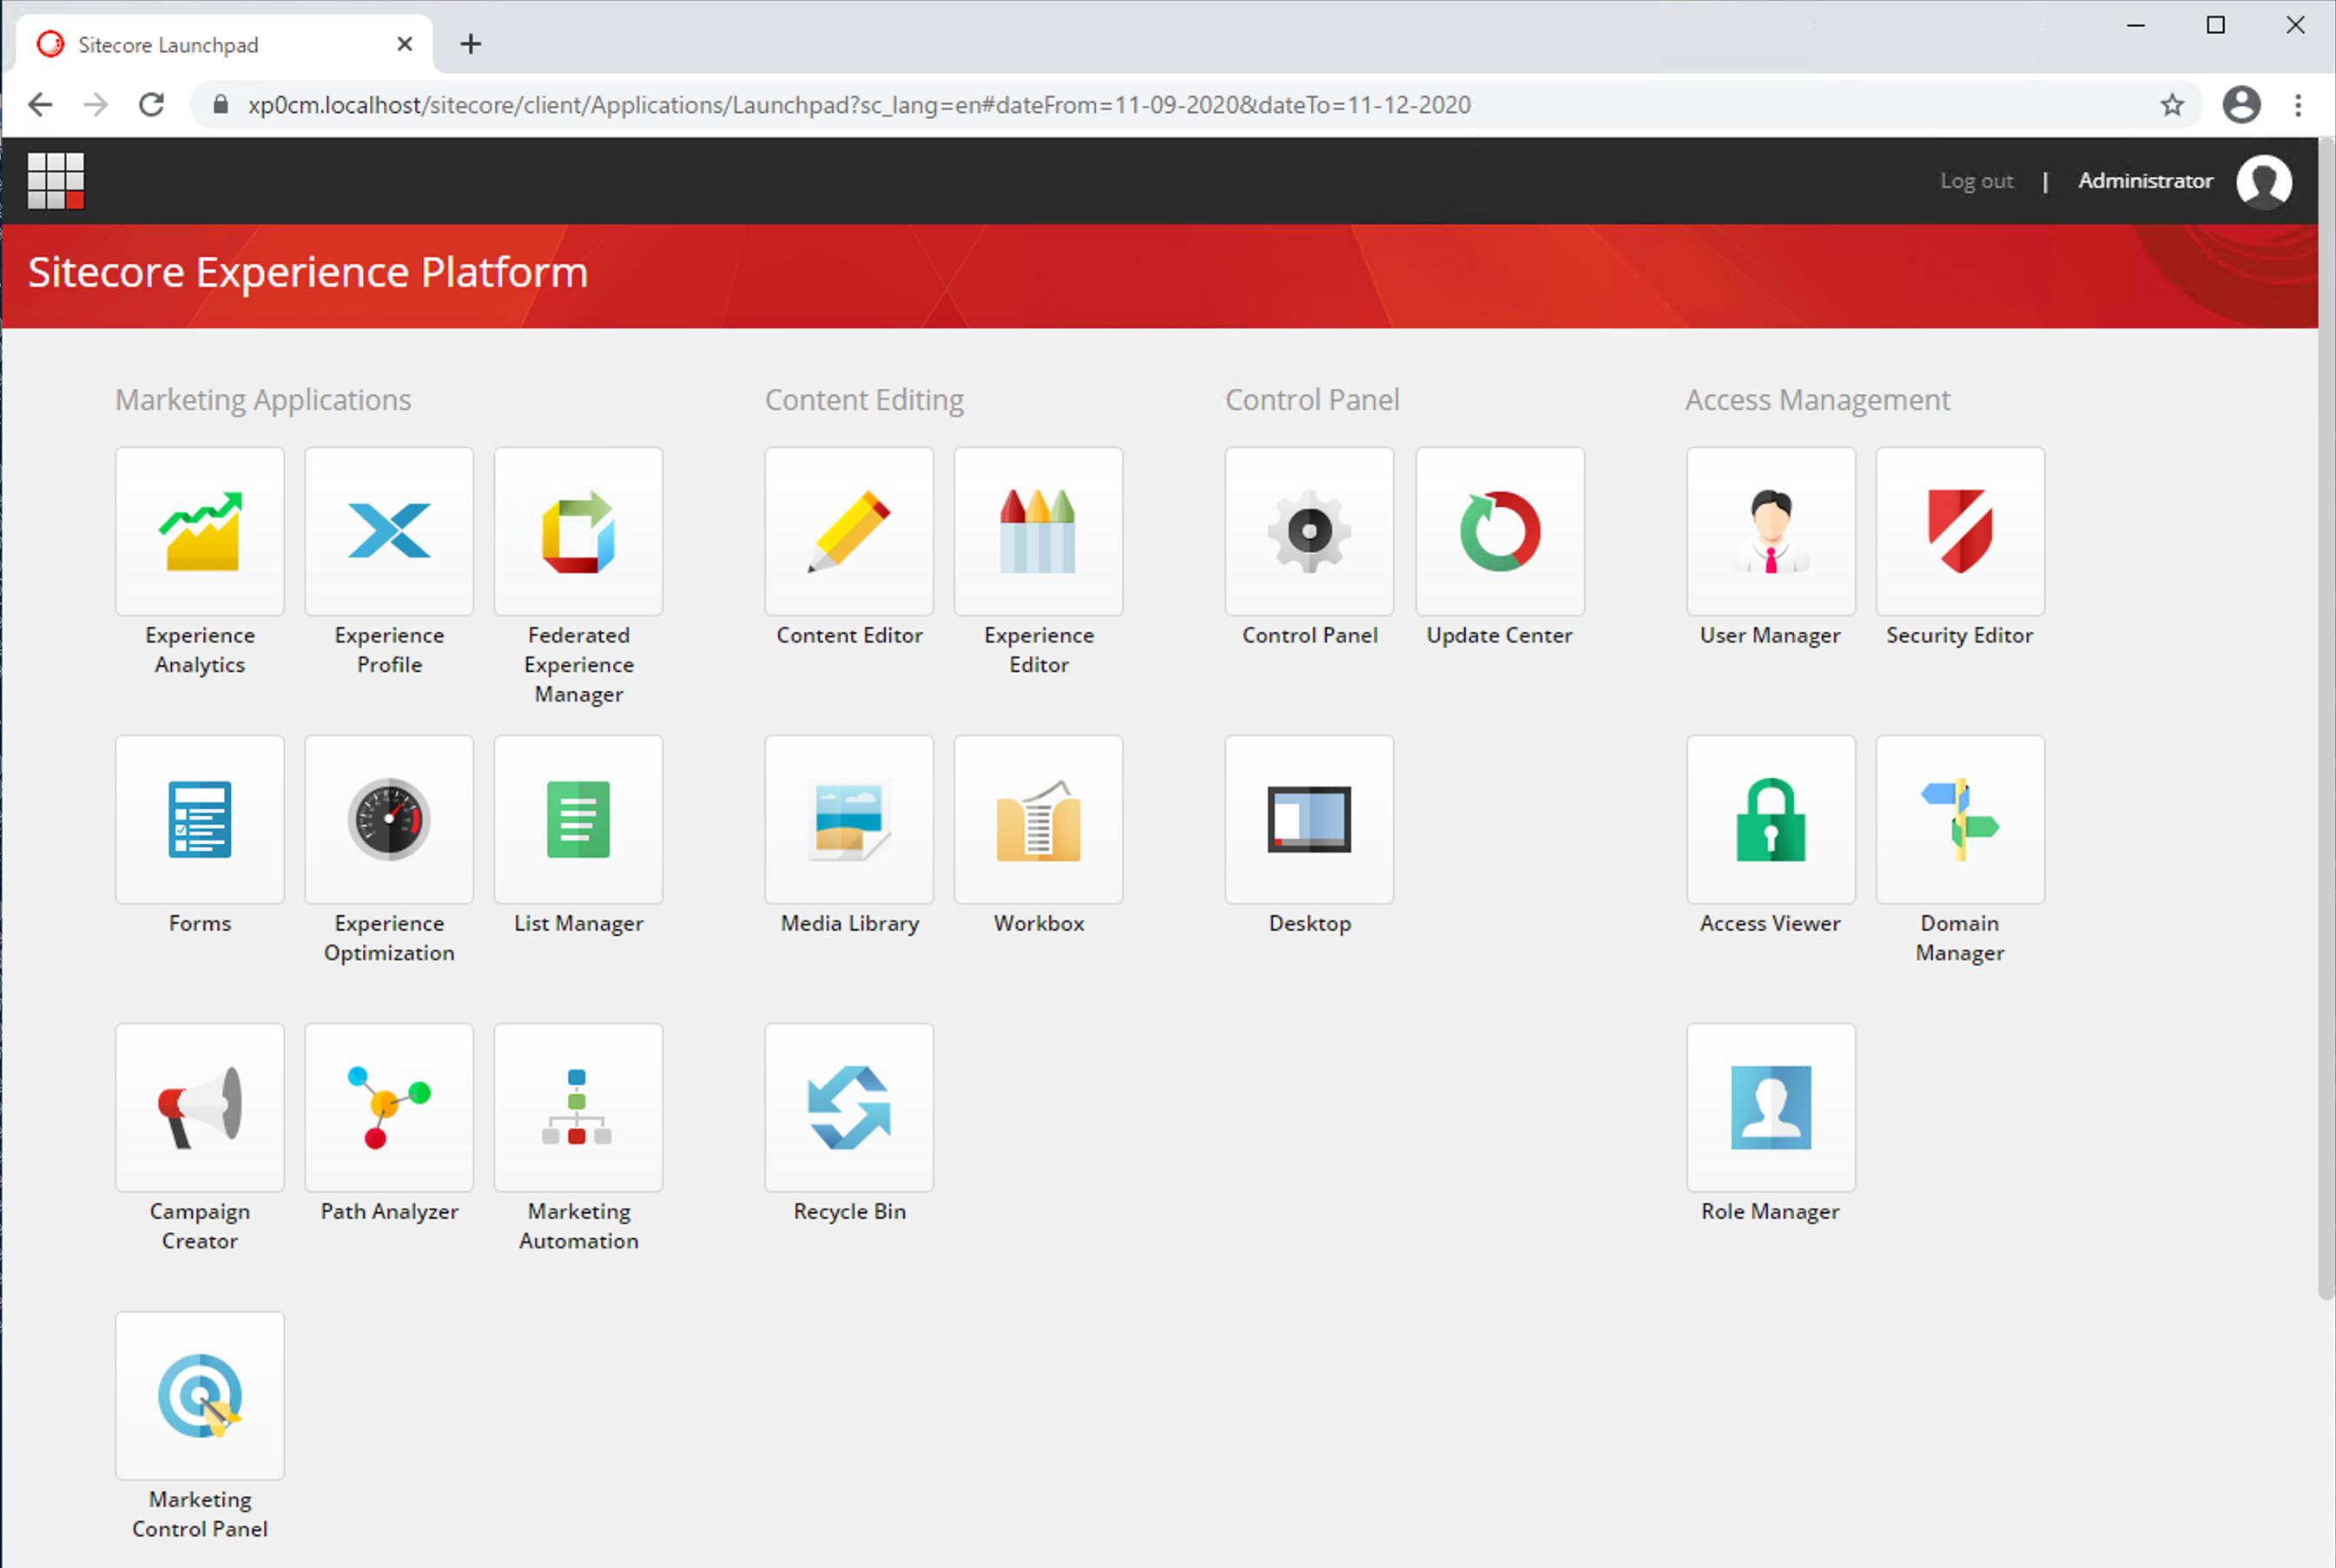
The Sitecore Welcome page will appear as shown below.

Add /sitecore to the URL to go to the login screen, where the Admin password is the password defined in .env. After successful login, the administration screen will appear.
Check Folders
We will now check how it actually works. First, data related to SQL Server and indexes are deployed in the following folders, respectively
- C:\projects\compose\ltsc2019\xp0\mssql-data
- C:\projects\compose\ltsc2019\xp0\solr-data
In other words, data is retained even when container use is stopped or terminated.
Tip: Since the SQL Server password is defined in .env, if the password is changed, the container must be stopped and closed, then deleted and deployed again.Stop, end
To stop the container, use the following command
PowerShell
docker-compose stop
In this case, the container is just stopped. If you actually want the container to be deleted,
PowerShell
docker-compose down
The container will be deleted by running docker-compose up -d. Running docker-compose up -d again will create the same container as the initial startup.