
Playwright のコンテナを動かすところまで進めていきましたが、以前の Sitecore Search のサンプルサイトと連携するように、今回は API を追加します。
API の動作に関して
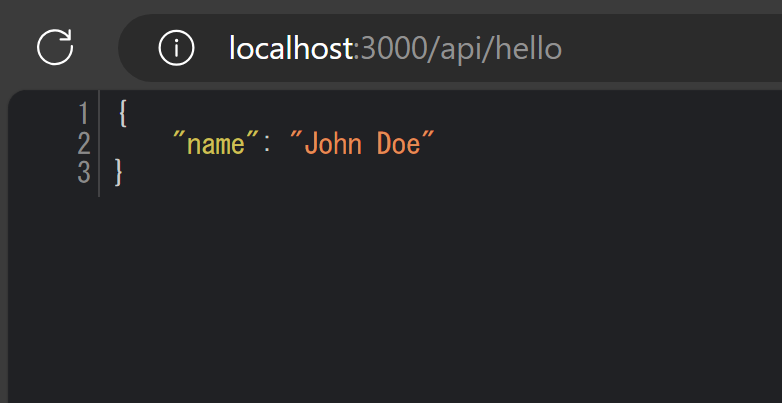
Next.js では src\pages\api のパスにファイルを配置すると、API として動作させることが可能となります。サンプルで入っている hello.ts は以下のようなコードになっています。
// Next.js API route support: https://nextjs.org/docs/api-routes/introduction
import type { NextApiRequest, NextApiResponse } from 'next'

type Data = {
  name: string
}

export default function handler(}
  req: NextApiRequest,
  res: NextApiResponse<Data>
) {
  res.status(200).json({ name: 'John Doe' })
}
この API にアクセスする際には、URL として http://localhost:3000/api/hello のようにアクセスすると以下のように結果が返ってきます。
上記のコードをベースに、作りこんでいきます。
作りたいサンプル
毎回スクリーンショットを取得するのは処理が重い形になるため、今回は動作として以下のように作成します。
初めて指定された URL に関して
スクリーンショットを取得
そのデータを Azure Blob Storage に保存する
画像のデータを結果として表示する
2回目以降
Azure Blob Storage に保存されているデータを読み込む
読み込んだデータを出力する
上記の場合 URL を利用して Azure Blob Storage にファイルを保存するかどうかを決めて行きます。
今回は以下の2つの処理を作っていきます。
URL を取得する
その URL に関してドメインとファイル名に分ける形とする
それではさっそく実装していきます。
URL の取得
今回は thumbnail.ts ファイルを以下のコードを利用して作成をします。
import type { NextApiRequest, NextApiResponse } from "next";
export default async function handler(
req: NextApiRequest,
res: NextApiResponse
) {
const { url } = req.query as { url: string };
if (!url) {
return res.status(400).json({ error: "Need URL Parameter" });
}
try {
const validUrl = new URL(url);
} catch (error) {
return res.status(400).json({ error: "Invalid URL" });
}
try {
return res.status(200).json({ url: url });
} catch (error) {
return res.status(500).json({ error: "Can't get content data" });
}
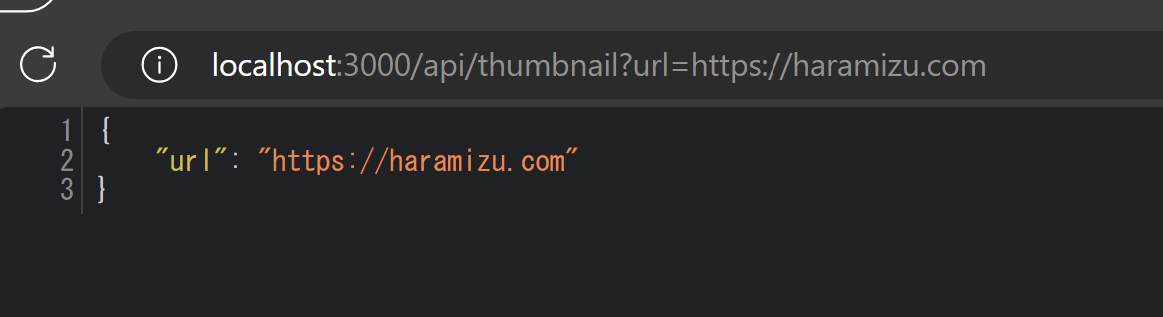
}URL を渡すと正しく取得できていることを確認できます。
ドメインのチェックとファイルパスの生成
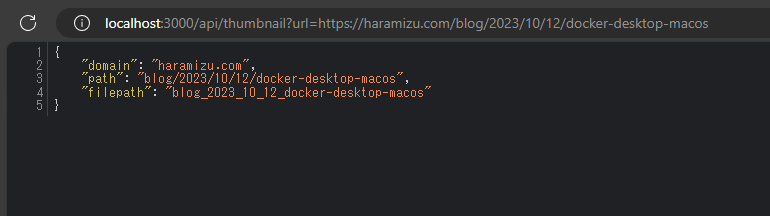
URL からドメイン名、およびパスを利用したファイル名を設定してきます。今回は、ドメイン以降のパスのうち / に関しては _ に変更する形でファイル名を決めて行きます。全体的に以下のように書き換えました。
import type { NextApiRequest, NextApiResponse } from "next";

export default async function handler(
  req: NextApiRequest,
  res: NextApiResponse
) {
  const { url } = req.query as { url: string };

  let domain: string | null = null;
  let path: string | null = null;
  let filename: string | null = null;

  // domain check
  try {
    if (typeof url === "string") {
      const parsedUrl = new URL(url);
      domain = parsedUrl.hostname;
      path = parsedUrl.pathname;

      if (!/\..{2,}$/.test(domain)) {
        throw new Error("Invalid URL: Domain is not correct");
      }

      // If the first character is /, remove
      path = path.substring(1);

      // If path is less than 1 character, rewrite it to index
      filename = path.replace(/\./g, "_").replace(/\//g, "_");

      // If the last character of filename is _, delete
      if (filename.endsWith("_")) {
        filename = filename.slice(0, -1);
      }

      if (filename.length <= 1) {
        filename = "index";
      }
    } else {
      throw new Error("Invalid URL");
    }
  } catch (error) {
    console.log(error);

    // Returns the response if an error occurs
    return { status: 400, body: "Invalid URL" };
  }

  try {
    return res
      .status(200)
      .json({ domain: domain, path: path, filepath: filename });
  } catch (error) {
    return res.status(500).json({ error: "Can't get content data" });
  }
}
URL の値を取得したあと、ドメインとパスに分けて、その結果を JSON で返している形です。例えば以下のような結果が表示されるようになります。
まとめ
今回は API の動作として URL を取得してその URL のデータを元に処理をする部分のみを作成しました。次回は指定された URL を利用してスクリーンショットを返す仕組みまで仕上げていきたいと思います。