
The Next.js sample is configured with bootstrap as the standard CSS style sheet, and although various CSS style sheets are provided, we will switch to using Tailwind CSS.
What is Tailwind CSS?
Tailwind CSS is a utility-first (specific styling rather than assigning class names to components) CSS framework that is easy for engineers to use.
It also introduces the procedure for using it with Next.js, and we will follow that procedure to switch the sample stylesheet to Tailwind CSS.
Install Tailwind CSS
Run the following command to install Tailwind CSS and related modules in the project you have already created.
PowerShell
npm install -D tailwindcss postcss autoprefixerYou will see that package.json has been updated and is now available.

Next, create a configuration file to use Tailwind CSS. This can be done simply by executing the following command
PowerShell
npx tailwindcss init -pYou can see that the tailwind.config.js and tailwind.config.js files have been created.

Specify the path to the created configuration file `tailwind.config.js` template, which is different from the web sample because the pages and other components are placed under the Sitecore template src.
JavaScript
module.exports = {
  content: [
    "./src/pages/**/*.{js,ts,jsx,tsx}",
    "./src/components/**/*.{js,ts,jsx,tsx}",
  ],
  theme: {
    extend: {},
  },
  plugins: [],
}
Then, create a file `global.css` under src/assets and create a style sheet as follows
CSS
@tailwind base;
@tailwind components;
@tailwind utilities;
Then change the stylesheet loaded in `_app.tsx` in src/pages.
JavaScript
import 'bootstrap/dist/css/bootstrap.css';
import 'nprogress/nprogress.css';
import 'assets/app.css';
Since we will not be using bootstarp, we will remove it and set the CSS file we created. In addition, you can also remove the comments section to make it a little cleaner.
JavaScript
import 'bootstrap/dist/css/bootstrap.css';
import 'nprogress/nprogress.css';
import 'assets/app.css';
Once you have made this change, and once you run it using jss start at hand, the top page will appear as follows.

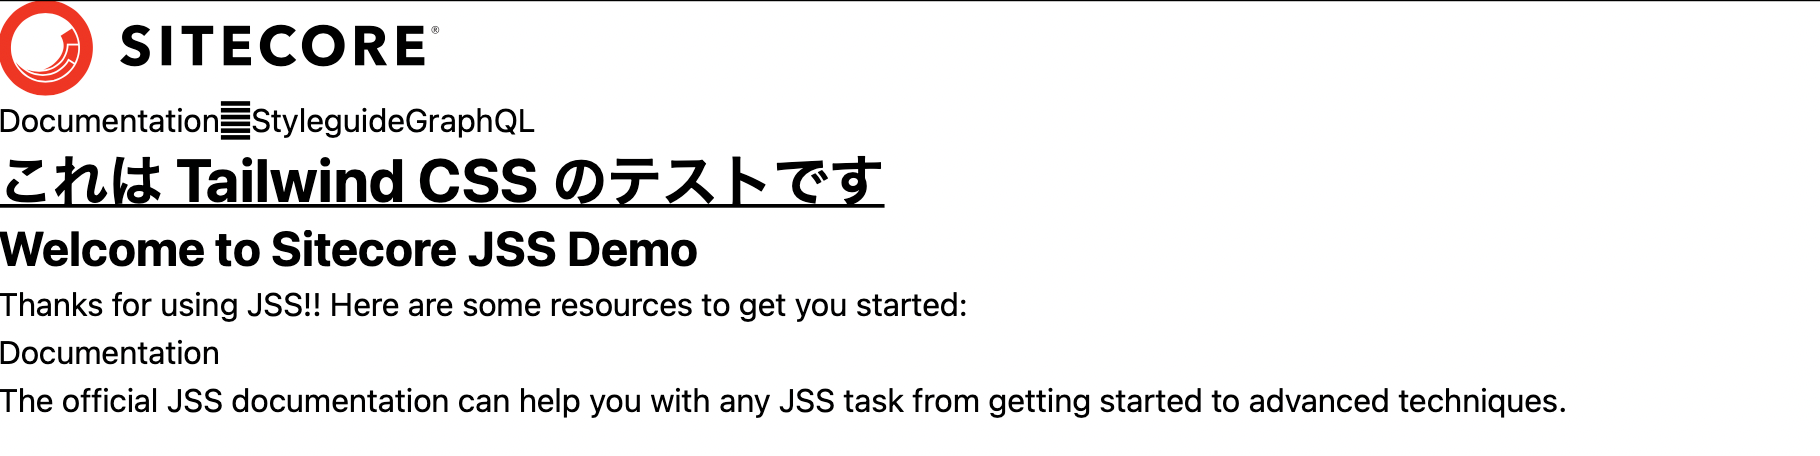
You can see that the Bootstrap stylesheet has been removed. Now we will use the following code to test if we can actually apply the stylesheet.
HTML
<h1 className="text-3xl font-bold underline">これは Tailwind CSS のテストです</h1>The target file is ContentBlock.tsx in src/components. This time, we just put the above sample code at the top as shown below.
TypeScript
const ContentBlock = ({ fields }: ContentBlockProps): JSX.Element => (
  <div className="contentBlock">
    <h1 className="text-3xl font-bold underline">これは Tailwind CSS のテストです</h1>
    <Text tag="h2" className="display-4" field={fields.heading} />

    <RichText className="contentDescription" field={fields.content} />
  </div>
);
Reloading the page will result in the following

Now rewrite the original code, changing the classname specified in the Text tag in the section where the content is loaded from the CMS.
TypeScript
const ContentBlock = ({ fields }: ContentBlockProps): JSX.Element => (
  <div className="contentBlock">
    <h1 className="text-3xl font-bold underline">これは Tailwind CSS のテストです</h1>
    <Text tag="h2" className="text-2xl font-bold" field={fields.heading} />

    <RichText className="contentDescription" field={fields.content} />
  </div>
);
After saving, the style sheet has been applied to the area where the H2 tag is used. No underlines are used in this case.
Summary
In this article I have shown you the first steps to apply Tailwind CSS. In the next article, I will refer to the code from https://tailwindui.com, which provides paid sample source code (I purchased it for this blog), and in the next article, I will create the navigation section.