
Previously, we installed Sitecore Connect for Content Hub. Once installation and setup are complete, integration with Digital Asset Management proceeds smoothly. This time, we will delve deeper into the integration with the Content Marketing Platform.
Preparation in Microsoft Azure
To integrate Sitecore Content Hub CMP and Sitecore CMS, we will use Microsoft Azure's Azure Service Bus. First, create a Service Bus.

When creating the price level, please set the price level to Standard.

Create a topic by selecting a topic from the menu on the left and choosing the name hub_out.

In the topic you created, create a subscription called Sitecore. In this case, we will use Sitecore.

Create hub_in in the same way as hub_out with the same settings, but with two topics.

Select the subscription for hub_out and set the message forwarding destination to hub_in.

Configure Sitecore Content Hub CMP
Create an account
First, create an account for the system linkage to be used by the connector.

Supeusers is applied to users as a group membership.

After creating an account, select Edit Profile and set your email address.

After setting your email address, click Reset Password to receive a password reset email.

After resetting your password, check to see if you can log in. If you can log in, you now have a Sitecore Content Hub account.
Create Action
The next step is to create a connection to the Azure Service Bus, which has been previously created. Create a new action in the Actions section of the Administration page. The input items are as follows.
Column | Value |
|---|---|
Name | Demo - CMP 2 Sitecore Action |
Label | |
Type | Azure Service Bus |
Connection String | Follow after this table |
Send Type | Topic |
Send to | hub_out |
For the connection string, an Azure Service Bus shared access policy has been created, select _RootManageSharedAccessKey_, select the primary connection string.

Set the primary connection string. The following screen shows the actual screen with everything entered. Click on the Test Connection button and verify that the test passes.

Creating Triggers
Now we will create a trigger. Open Triggers from the admin page and proceed to create a new trigger. On the first screen, configure the following settings
Column | Value |
|---|---|
Name | Demo - CMP 2 Sitecore Trigger |
Objective | Change Entity |
Type | Background |

Next, switch to the Conditions tab. Here, the trigger is triggered by changes to M.Content, and we want the trigger to run when the status changes to Published. So, the configuration is as follows.

Finally, switch to the Actions tab and select the action you just created.

When all settings are complete, click Save and Close. You will then be asked if you want to activate the trigger.

Enabling this setting completes the configuration on the Sitecore Content Hub CMP side.
Sitecore Settings
Configuration of ConnectionStrings.config
During the last Sitecore Content Hub DAM configuration, the following items were not set in ConnectionStrings.config.
XML
<add name="CMP.ContentHub" connectionString="ClientId={client_id};ClientSecret={client_secret};UserName={username};Password={password};URI={uri};" />
<add name="CMP.ServiceBusEntityPathIn" connectionString="{Azure Service Bus connection string with incoming topic}" />
<add name="CMP.ServiceBusSubscription" connectionString="{Subscription name}" />
<add name="CMP.ServiceBusEntityPathOut" connectionString="{Azure Service Bus connection string with outcoming topic}" />
The following items will be set
Parameter | Value |
|---|---|
Client Id | LogicApp |
Client Secret | Following after this table |
Username | Name of the administrator who created it |
Password | Password of the created administrator |
Content Hub URI | Content Hub ServerURL |
Connection String | Service Bus Endpont |
incoming topic name | hub_in connection string |
outcoming topic name | Connection string for hub_out |
Incoming subscription name | sitecore |
For Client Seacret, open the Sitecore Content Hub administration page, Oauth Client. You can then browse the LogicApp settings.

The screen with all of the above values set is shown below for reference.
XML
<add name="CMP.ContentHub" connectionString="ClientId=LogicApp;ClientSecret=xxxxxxx-xxxx-xxxx-xxx-xxxxxxxxxxxx;UserName=CMPDemo;Password=Password;URI=https://yourdemo.stylelabs.io;" />
<add name="CMP.ServiceBusEntityPathIn" connectionString="Endpoint=sb://demodemo.servicebus.windows.net/;SharedAccessKeyName=hub_in;SharedAccessKey=hereiskenumberforhubin;EntityPath=hub_in" />
<add name="CMP.ServiceBusSubscription" connectionString="Sitecore" />
<add name="CMP.ServiceBusEntityPathOut" connectionString="Endpoint=sb://demodemo.servicebus.windows.net/;SharedAccessKeyName=hub_out;SharedAccessKey=itishuboutsharedaccesskey=;EntityPath=hub_out" />
Creating Templates
Create a bucket directly under /sitecore/content/CMP to store items provided by CMP. In this case, we will use Blog.

Then create a template for this item. Create a Blog template directly under /sitecore/templates/User Defined templates. In this case, we have created a Title (one line of text) and Body (rich text) field.

Then select the content in the tab for the template you are creating. Select the Content Hub Entity in the CMP template list.

Select the View tab and check Standard Fields and Buckets.

Select the Builder option in the menu and click on Standard Value.

In the Item Bucket Settings section, check Allow Bucketization.

Save and the template is complete.
Entity mapping
The next step is to map the fields defined in the Sitecore Content Hub CMP to the fields in the Sitecore template. Right-click on an item in /sitecore/system/Modules/CMP/Config to start creating Entity Mapping items.

In this case, the item will be created as a Blog. The following are the settings to be made
EntityTypeSchema should be the content type identifier found in the Content Hub taxonomy.

Buckets are items in buckets that have been created in advance, and templates are templates that have been created in advance. The last item is the item name definition. The ItemNameProperty should be set to Content.Name so that the item name created in Content Hub will be applied. In this case, the finished product will look like this.

Adding Fields
Next, we will specify the fields. First, we will create the content for our blog in order to check the Content Hub data schema. Check the URL of the blog you are creating, for example
- https://yourinsctance.io/ja-jp/content/detail/37649
For the above URL, rewrite /en-jp/content/detail/ as /api/entities/ to refer to the data of the entity being created.
- https://yourinsctance.io/api/entities/37649

Referring to the Json data, we see that properties - Content.Name has already been created. For blogs, the following items are covered
JSON
"Blog_Title": null,
"Blog_Quote": null,
"Blog_Body": null,
This time, we would like to link two of them, Blog_Title and Blog_Body.
Return once again to the Sitecore environment. This time we will add two fields and add a configuration that matches the name of the Content Hub schema with the name of the Sitecore field. Here is what we are setting up this time


This completes the setup.
Operation verification
Open the Content menu of the Sitecore Content Hub and click +Content to begin creating new content.

When you start creating, you will see a title and an area for articles, since this is a blog. In this case, I entered the following.

We should originally do a little more content setup, but since this is a test, we will proceed with just this item. We will proceed with the workflow.
- Start
- Send Review
- Approve
After clicking "Approve," the following dialog box appears

After clicking Confirm, the content status will change to Ready to Publish. This change should trigger an action, so open Administration - Actions and open Audit. Here at the top is the log of the action performed.

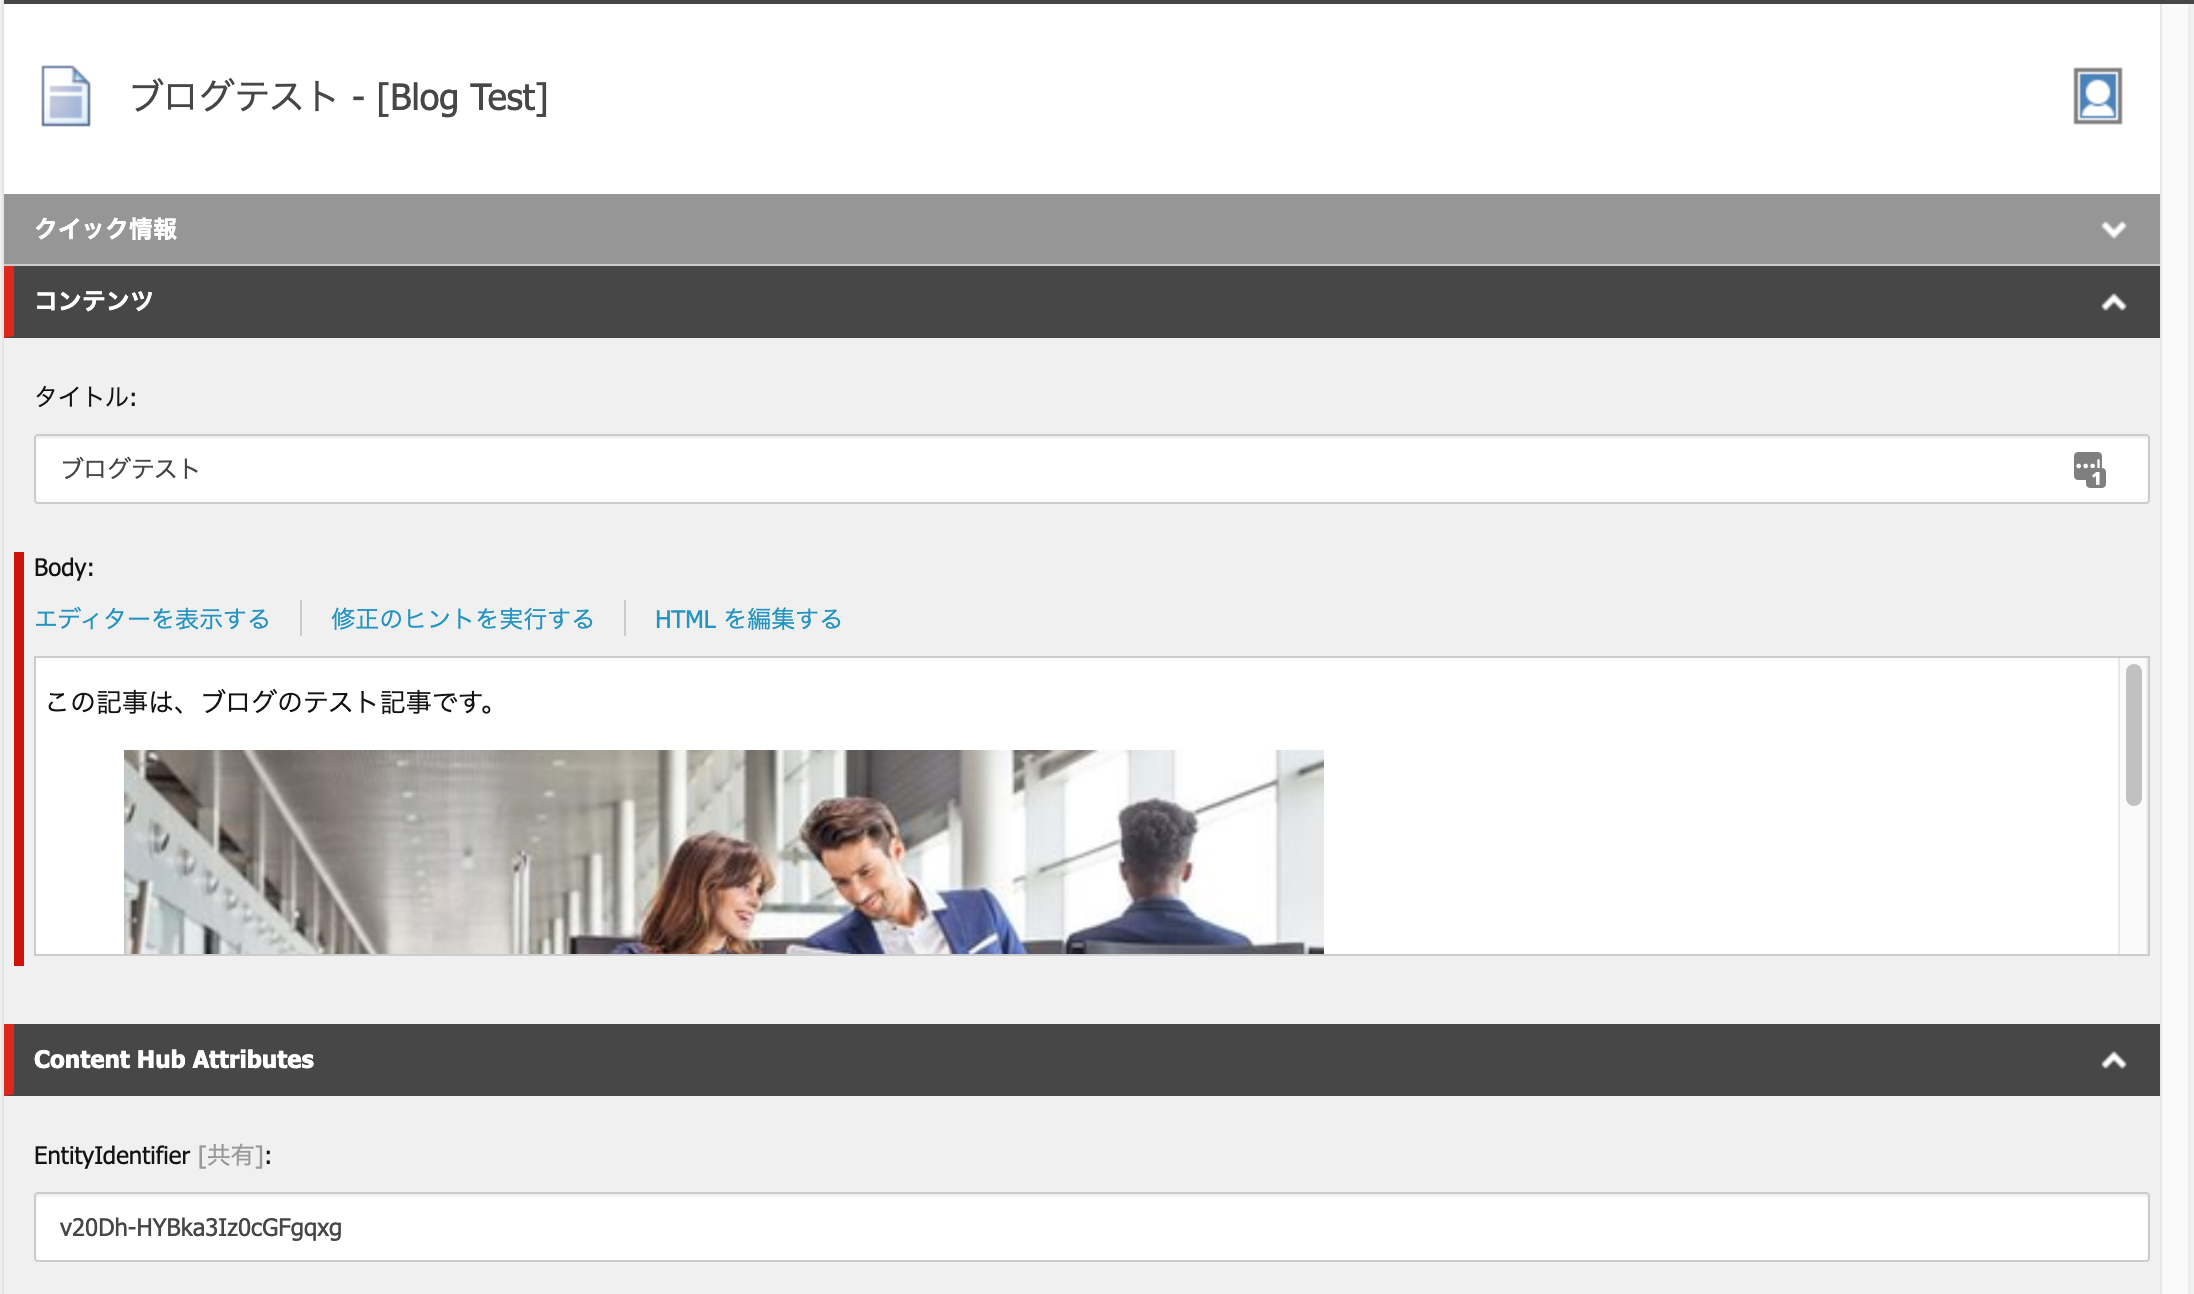
Switching to the CMS screen, we see that one subitem has been created in the item bucket under the CMP item.

If you select an item in the Blog and search for it in Test, you will see that the item has been created in the bucket.

When you select an item, you will see that the name you created in CMP is in the Item Name, the Blog_Title data is in the Blog Title and Article Title, and the Body contains the body of the Blog.
An identifier is also included in the item, and we can see that this identifier contains the same value as the identifier of the item created by the CMP.
Summary
Thus, content created with the Sitecore Content Hub CMP could be created as an item in the Sitecore CMS. If the content is routine, it can be operated in the form of pages created with CMP. This also increases the number of content types that can be created with CMP.