
In this article, we will introduce the basic steps for development by creating a sample integration between Box and Sitecore Content Hub's DAM. The following is a step-by-step guide to setting up the Sitecore Content Hub.
Prerequisite
The prerequisites for this demonstration implementation are as follows
- I have a Box account
- Logic App for Microsoft Azure is available
- Sitecore Content Hub 3.4.6
This explanation is based on Box as a sample, but OneDrive and Dropbox can be implemented in the same way.
Can't I import directly from Box?
In order to import Box files directly, the Sitecore Content Hub needs to be able to access Box files via a web service.
For example, suppose that the URL when referring to a file in Box with a Web browser is as follows.
- https://sample.app.box.com/folder/130423025175

This URL is only accessible to those who have a Box account and are authorized to access it. To share a file, configure as follows

The generated URL will be as follows
- https://sample.box.com/s/yj8uanz65m2aml342p7xfoioyi0hj632
Accessing this URL will only allow you to view the page as shown above, but will not allow you to access the file directly. To obtain the URL to download the asset directly, click on the link setting shown in the dialog to obtain another URL.

The direct link listed under "Allow Download" is the URL for downloading.
- https://sample.box.com/shared/static/yj8uanz65m2aml342p7xfoioyi0hj632.jpg
Now you have the URL for direct download. The /s/ becomes /shared/static/, and it looks like the file can be downloaded by adding the file extension, but this URL is only a URL and is not the actual file. If you access this URL, you will be redirected to the following URL, where you can download the file.
- https://dl.boxcloud.com/d/1/{random-key}/download
A random key will be issued to allow you to download from a very long URL. This URL is automatically generated when the above download URL is accessed and expires, so it will change after a while. Therefore, it cannot be used as a fixed URL for importing. On the other hand, Sitecore Content Hub importing works by importing the data in the URL, making it difficult to import assets without a fixed URL.
In this case, we will create a sample program that automatically uploads files to the Sitecore Content Hub when a file is uploaded to the Box as a trigger.
Preparing for Sitecore Content Hub
This time, since the upload will be done via a web service, a token for use with the web service is required. The procedure for creating a token is as follows
- Open the user in the admin panel.
- Create a new user (in this case SitecoreDemo)
- Set permissions
- Obtain user tokens

Storage Preparation
In this implementation, we will retrieve files from Box and upload them to the Sitecore Content Hub. To do this, we will create temporary storage for the files in Azure.
- Click Add in the resource list of the resource group
- Search by Storage Account
- Select a storage account
- Name and create

As the storage you have created, create a container for BLOBs (anonymous read access for BLOBs only) so that you can easily check the upload of files. Click on the container under Blob service in the menu on the left. You will then switch to the screen below.

Next, add a container. The dialog on the right provides an input field, this time named boxdemo. This time, the access level is set to BLOB (anonymous read access for BLOB only) because we are in the process of creating a Logic App process and want to see if it has been uploaded correctly.

This completes the storage preparation.

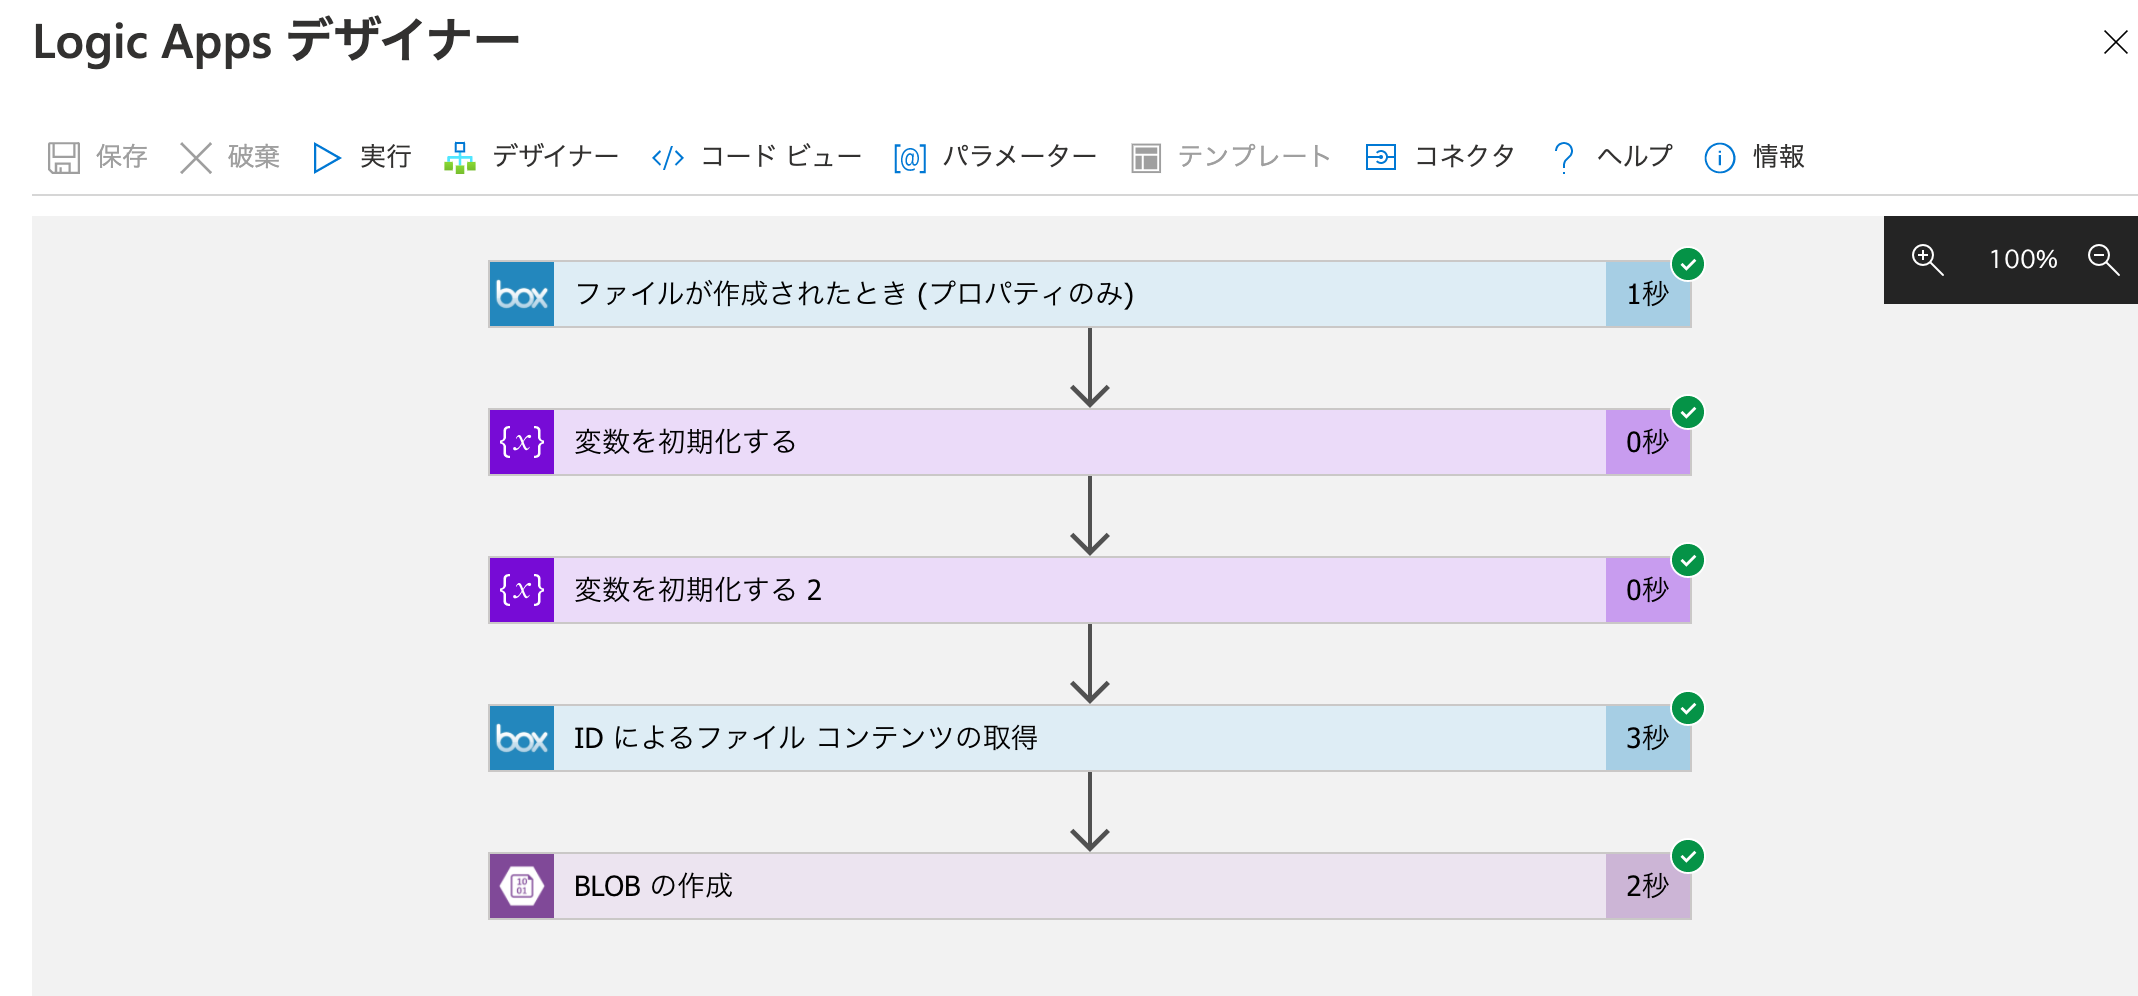
Creating a Logic App
From here, the procedure is to create a Microsoft Azure Logic App. Create it by adding it in the Resource Group and searching for Logic App. In this case, we will name the app Box2DAM.

Open the created Box2DAM resource. Since nothing has been defined yet, the initial screen is displayed.

This time, select an empty Logic Up. You will then be taken to the empty designer screen.

Work with Box
First, to set up the trigger to run when a file is created in the box, we do a search in the box to set up the first step.

Selecting a box will display multiple triggers.

For this trigger, select when the file is created (properties only). Then the Box login screen will appear as shown below.

Once you have logged in, you will see the following screen.

In this case, Box Demo was specified as the folder for Box.

By saving this, Logic App will check once every 3 minutes to see if a file has been uploaded to the corresponding folder in the Box, and if so, Logic App will run. Please actually place the file in the folder and execute the trigger. A sample of the result will be as follows.

JSON
{
  "Id": "769263266879",
  "Name": "boxlogicapp4.png",
  "DisplayName": "boxlogicapp4.png",
  "Path": "/すべてのファイル/Box Demo/boxlogicapp4.png",
  "LastModified": "2021-01-28T04:13:13+00:00",
  "Size": 203204,
  "MediaType": "image/png",
  "IsFolder": false,
  "ETag": "\"0\"",
  "FileLocator": "769263266879",
  "LastModifiedBy": "Shinichi Haramizu"
}
Temporarily save files to storage
We will add steps to upload files uploaded to Box to storage in Azure.
Get ID of Box file
The first step is to set the variable to the Id used in the result of the first trigger to upload the Box file. First, add an action and search for it in the variable.

Select Initialize variable from the actions for the specified variable.

The name is FileID, the type is a string, and the value is an ID from the above Box result. The workflow is as follows.

Get Box file name
Obtains a file name in the same way as the above ID acquisition. The procedure is the same as above, but the parameters are different. Please refer to the following dialog for input items.

Retrieving file contents
The actual content of the file is retrieved, for which Box actions are provided, searched in Box, and the list of actions is displayed.

From the list of actions, select Retrieve file contents by ID.

A dialog box will appear. Enter the FileID defined as a variable above and save it.
Store data in storage
Now that we have all the data to upload to storage, the next action is to create a file in storage. First, a search for Blob will bring up the following screen.

Select Create Blob from the Actions. Once created, you will see a list of the storage available for your subscription.

This time, select the already prepared contenthubdemo. Fill in the connection name and press the Create button. Then you will see the following dialog.

The screen where the values are set is shown below.

Confirmation of operation
To check the operation, place a file in the box and see if the file is created in the storage.
- Upload files to Box
- Run the triggers you are creating (because waiting once every 3 minutes is time consuming)
- Confirm that the file has been created in storage from the Azure Portal screen

- Check the appropriate file

Copy the URL of the file and verify that the file has been uploaded correctly in another browser window.
Upload files in storage to the Sitecore Content Hub
Since the Box file is already ready, the next step is to upload it to the Sitecore Content Hub. From here, we will access the Sitecore Content Hub via a web service, so we will need to call the server instance and token in a variable. The configuration is as follows


Entity Creation
To register an asset in the Sitecore Content Hub, you must first create a new entity in the Sitecore Content Hub.
This is handled by the HTTP action of the Logic App. First, specify HTTP in the new action.

When HTTP is specified, several actions are displayed.

This time, we select the topmost one, Normal HTTP. The dialog will then change to the following

This dialog allows you to enter the HTTP process. The method and header information should be summarized as follows :

The following URL shows how to create a new entity.
Please include this Json in the body of the text.
JSON
{
    "properties":{
        "Property1":"Some value",
        "Property2":42
    },
    "relations": {
        "FinalLifeCycleStatusToAsset": {
            "parent": {
                "href": "http://hostname/api/entities/{id}"
            }
        }
    },
    "entitydefinition":{
        "href":"http://hostname/api/entitydefinitions/EntityDefinition1"
    }
}
The above text will be changed slightly.
In properties, you will define the attributes of the file. In this case, since it is only a file name, it should be rewritten as follows, where FileName is the variable to which the value obtained from the Box is set.
JSON
    "properties":{
        "Title":"FileName"
    },
Then set the ID of the file's life cycle to FinalLifeCycleStatusToAsset, which is listed in relations. In the management screen of the destination to be connected,
- taxonomy
- Select M.Final.LifeCycle.Status
- Select taxonomy for UnderReview
- The value in the URL is the ID
The URL is https://servername/ja-jp/admin/taxonomymgmt/43?s=543, so 543 is the ID. To check if the ID is correct, you can also visit https://servername/api/entities/543.

The finished product will therefore look like this
JSON
    "relations": {
        "FinalLifeCycleStatusToAsset": {
            "parent": {
                "href": "http://hostname/api/entities/543"
            }
        }
    },
The last item, entitydefinition, must define the name of which entity type is to be used. In this case, we specify M.Asset since it is an asset.
JSON
    "entitydefinition":{
        "href":"http://hostname/api/entitydefinitions/M.Asset"
    }
The result of reflecting the above values is an image like the following. hostname must also be specified as a variable.

This will create a new entity. Let's actually copy the file to the box folder and run it. If you get the following JSON as a result, you have created a new entity.
JSON
{
  "id": 31993,
  "identifier": "m8UQf1YvlESJ2pbtvATQeA"
}
Update Entities
Perform an update to a file that has been previously uploaded to Azure storage on the entity you have created. As for how to perform this execution, the following URL process is to be performed.
A sample of the body text to be posted is as follows
JSON
{
    "state_description":"",
    "asset":{
        "href":"/entities/23"
    },
    "files":[
        {
            "type":"File",
            "path":"\\server\path\file1.jpg"
        },
        {
            "type" : "Web",
            "href" : "http://www.gstatic.com/webp/gallery/5.jpg"
        },
        {
            "type":"Azure",
            "key":"fileProviderName-/path/to/file/on/blob/storage.jpg"
        }
    ]
}
The first value is asset.
JSON
    "asset":{
        "href":"/entities/23"
    },
At this number, we need to set the ID of the asset to be updated. So, we can use the result of the HTTP that is being performed one step before as a value using JSON parsing. Choose Data Manipulation as the new step behind HTTP.

Under Data Manipulation Actions, select Analyze JSON.

The content is the HTTP body text of the previous one. The items to be entered into the schema are created by inserting the JSON data from the preliminary test results as a sample payload. The work is as follows.

Now you can get the ID of the entity from the JSON data. Rewrite the following to include the name of the server, etc.
JSON
    "asset":{
        "href":"https://hostname/api/entities/EntityID"
    },
The JSON items listed below are as follows.
JSON
    "files":[
        {
            "type":"File",
            "path":"\\server\path\file1.jpg"
        },
        {
            "type" : "Web",
            "href" : "http://www.gstatic.com/webp/gallery/5.jpg"
        },
        {
            "type":"Azure",
            "key":"fileProviderName-/path/to/file/on/blob/storage.jpg"
        }
    ]
There are three patterns for reflecting files, as described above, but this time the Web is the target. The description is very simple and is as follows
JSON
    "files":[
        {
            "type" : "Web",
            "href" : "http://www.gstatic.com/webp/gallery/5.jpg"
        }
    ]
All that remains is to correct the URL to the URL that is being uploaded to storage. The code that reflects all of the above is as follows.
JSON
{
    "asset":{
        "href":"https://@{variables('hostname')}/api/entities/@{body('Parsing_JSON')?['id']}"
    },
    "files":[
        {
            "type" : "Web",
            "href" : "https://contenthubdemo.blob.core.windows.net@{body('BLOB_Create')?['Path']}"
        }
    ]
}
Upload Test
If the implementation has been completed correctly up to this point, the files in the folder specified in the Box will be uploaded to the Sitecore Content Hub. Note that the file is under review when it is uploaded, so please log in as a user with review privileges to confirm the file.

After placing the file in the Box, we were able to verify that the file was uploaded as an asset in the Sitecore Content Hub.
Summary
In this case, we have built a mechanism to automatically upload from Box to the Sitecore Content Hub using the API. By applying this form, you will understand how to create a dedicated tool for migration (which can be created through web service integration).
And this time, by using the Logic App mechanism, multiple steps are triggered by the creation of a file, and actions are used to access other environments and summarize data.