
In the previous article, we covered the initial setup for automatic asset tagging. The second part will focus on processing the acquired data in the Logic App to incorporate machine-translated results.
Sitecore Content Hub Taxonomy - Implementing Translation Integration for Automatic Tags - Part 2
Digital Asset ManagementPublished: 2021-01-19
Creating a LogicApp
When a new tag is generated in the Sitecore Content Hub, a trigger is executed and the action specified in the trigger is now performed. Now we will create a procedure that uses the information in the Message that was sent to process it on the Logic App side and return it to the Sitecore Content Hub.
Adding Logic App resources
Add the Logic App resource to the resource group you are managing this time. Open the resource group, press Add, select Logic App, and create it. The name of the app to be created is TagTranslator in this case.

Adding Processes in the Logic App Designer
This time, we will create a Logic App that runs when a request comes in to the Service Bus. For this purpose, we will add processing as follows.
Processing when a Message is received
First, the Logic App Designer will appear, where you can select an empty logic app.

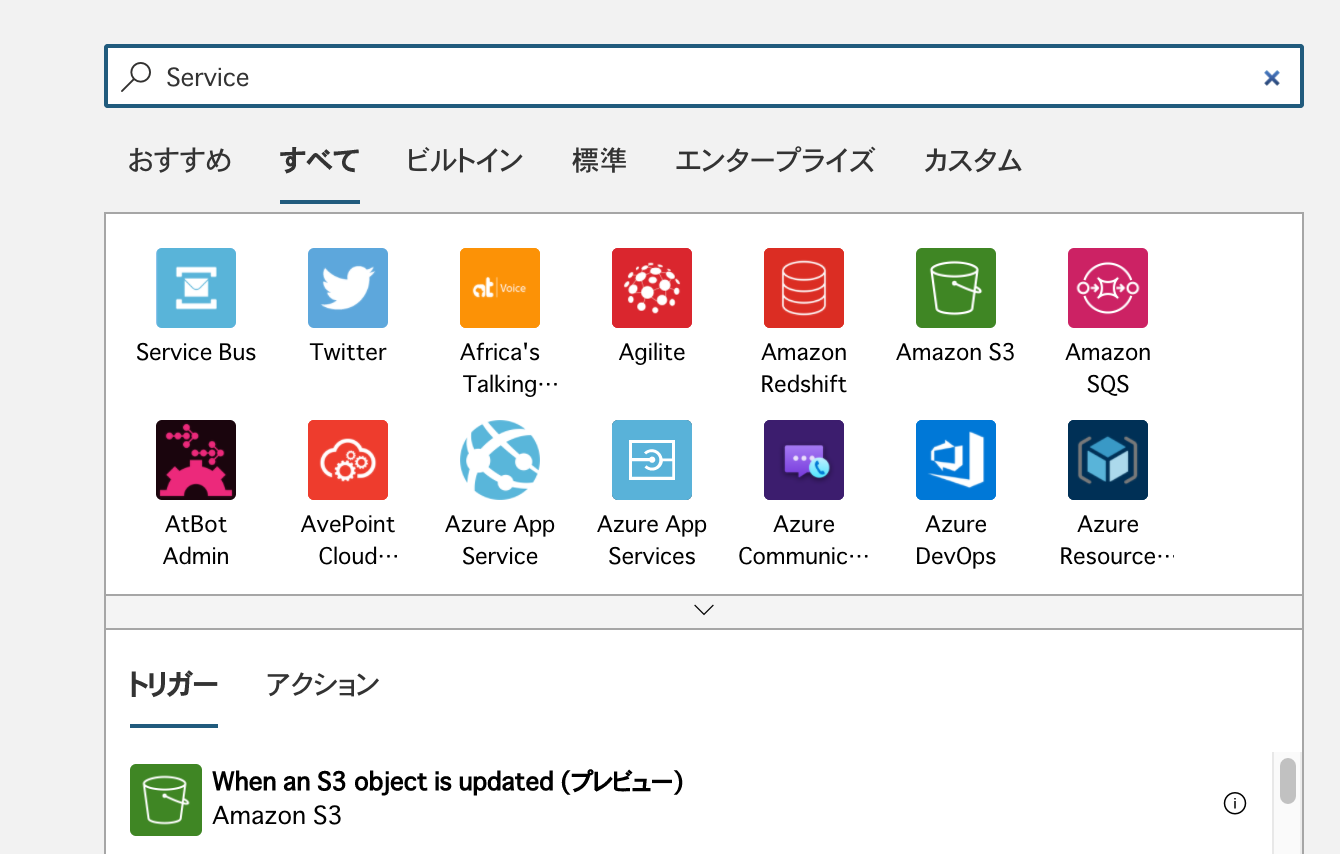
In order to use the Service Bus for processing this time, type "Service" in the search box to display the target functions.
In order to use the Service Bus for processing this time, type "Service" in the search box to display the target functions.

This time, select When a message arrives in a topic subscription (Auto Complete). You will then switch to the following screen

After selecting the Service Bus namespace, you will be taken to the Service Bus Policy screen.

Select the policy you want to use from the policies displayed, the Create button will be enabled, and click on the button. You will then be taken to the following screen.

You can select topics and subscriptions that you have already created, so select each one to complete the process.

Once you have reached this point, perform a save.
Obtain parameters from received messages
Then retrieve the parameters from the topic being submitted. Click on the New Step button. Select Variables as the next step, this time to perform variable initialization. You will see several triggers, but this time select Initialize variable.

Set the following values
Column | Description | Example |
|---|---|---|
Name | Variable Name | source_host |
Type | Data type | String |
Value | Initial value | Code below |
JSON
@{triggerBody() [ 'Properties' ] ['host_header']} The video you are working with will be as follows. As for the values, we are adding host_header once we switch to the code view to get the custom headers defined in the action.

The same procedure is used for Token.
項目名 | 役割 | 例 |
|---|---|---|
名前 | 変数名 | token |
種類 | データの種類 | 文字列 |
値 | 初期値とする値 | 下記コード |
JSON
@{triggerBody() [ 'Properties' ] ['token']}仕上がりは以下の通りとなります。

データの処理
すでに送信されている Message に関して、データ操作を実行して Logic App で利用できる様に変換をします。まず最初に、データ操作を選択します。

データ操作に紐づいているアクションから作成を選択します。

入力の項目ですが、送信されているデータを Base64 で処理をして文字列として扱えるようにします。コードとしては以下の様に設定される様に作成します。
JSON
{
    "inputs": "@base64ToString(triggerBody()?['ContentData'])"
}
今回は以下の様に入力しました。

文字列の操作をしたあと、もう一度データ操作を追加します。データ操作は、JSON の解析 を選択してください。

設定内容としては、コンテンツの項目には1つ前のステップで実行した出力を設定、またスキーマには以下のスキーマを設定します。今回はターゲットとなるエンティティの ID を取得するのが目的となるため、以下のスキーマを設定します。
JSON
{
    "properties": {
        "saveEntityMessage": {
            "properties": {
                "TargetId": {
                    "type": "integer"
                }
            },
            "type": "object"
        }
    },
    "type": "object"
}
実際のスキーマの設定に関しては、Postman などを利用して Web サービス経由で必要な JSON データを取得、設定する形となりますが、今回はこの手順を省略しています。作業をしている手順画像は以下の通りとなります。

これで Sitecore Content Hub の対象エンティティに対してアクセスするためのデータが揃いました。
Sitecore Content Hub からデータを取得
Service Bus に投げられているメッセージには、エンティティのデータは含まれていないため、このタイミングでエンティティの情報を取得します。サーバーにアクセスするための処理として HTTP の処理を追加します。

アクションとしては、一番上に表示されている HTTP を選択します。

以下の様な項目が表示されます。

入力する項目は以下の通りです。
項目名 | 役割 | 例 |
|---|---|---|
方法 | アクセス方法 | GET |
URI | アクセスする URI | https://source_host/api/entities/TargetId |
ヘッダー | ヘッダー値 | Content-Type と X-Auth-Token |
URL や X-Auth-Token に関しては、変数および JSON の解析結果取得したデータを設定します。作業としては以下の様になります。

これで Sitecore Content Hub の対象エンティティからデータを取得できるようになりました。
取得したデータから翻訳対象を取得
取得した JSON のデータの処理をするために、改めてデータ操作を追加します。今回は HTTP で取得した本文に対して、以下の JSON スキーマを適用します。以下のスキーマはタグの英語のラベルだけを取得したいため、以下の様になります。
JSON
{
    "properties": {
        "identifier": {
            "type": "string"
        },
        "properties": {
            "properties": {
                "TagLabel": {
                    "properties": {
                        "en-US": {
                            "type": "string"
                        }
                    },
                    "type": "object"
                }
            },
            "type": "object"
        }
    },
    "type": "object"
}
手順は以下の様な動画となります。

上記の値で取得したタグの英語のラベルに関して、機械翻訳エンジンに渡すために変数として定義します。今回は EnglishLabel という名前とし、初期設定は en-US の値を設定します。

これで機械翻訳で処理をする文字列の取得ができました。
テキストの翻訳
取得したデータから、英語のタグラベルを取得して Microsoft Translator にデータを渡します。まず最初に、Microsoft Translator のリソースを初回に追加する場合は、キーを取得する必要があります。キーは、Cognitive Service を開き、キーとエンドポイントをクリック、キーが2つ表示されます。今回は、キー 1 を利用します。

このキーを Subscription Key に設定してください。これは初回実施すれば、2 回目からは省略できます。

続いて表示されるのがアクション一覧になります。英語を日本語に翻訳することは決まっているので、Translate text(プレビュー)を選択します。

続いて表示されるのが Target language、Text および Add new parameter の項目となります。

ソース言語を英語、翻訳ターゲットを日本語、翻訳する言葉は手前で準備している EnglishLabel を指定します。

これで翻訳処理まで進みました。この結果を元のデータに反映させます。
タグのデータを更新する
データを反映させる際も、改めて HTTP リクエストを送信します。今回は更新する内容を本文に記載しながら、Web サービスにアクセスをすることになります。
項目名 | 役割 | 例 |
|---|---|---|
方法 | アクセス方法 | GET |
URI | アクセスする URI | https://source_host/api/entities/TargetId |
ヘッダー | ヘッダー値 | Content-Type と X-Auth-Token |
本文 | リクエストをする JSON データ | 下記のコードを参照 |
JSON
{
  "cultures": [
    "en-US",
    "ja-JP"
  ],
  "entitydefinition": {
    "href": "https://source_host/api/entitydefinitions/M.Tag",
    "title": "The entity definition for this entity"
  },
  "identifier": "identifer",
  "properties": {
    "TagLabel": {
      "en-US": "EnglishLabel",
      "ja-JP": "翻訳されたテキスト"
    }
  }
}
実際に更新している模様は以下のような画像となります。

これで Logic App が完成しました。
Confirmation of operation
Upload a new file, assuming the above settings have been completed. After uploading, set Social Media Asset as the asset type. By setting this asset type, it will move to assign tags using the Vision API.

Background processing confirms that the job has been processed.

In this state, you can refer to the audit log of the action to see if it is processing against the Azure Service Bus.

Now let's go to the Logic App screen. If you open the execution history, you will see that the necessary operations have been executed. If not, please check the Logic App settings, and check the integration with Sitecore Content Hub (e.g. Token).

Summary
In this case, we set up a trigger when a new tag is created (M.Tag), created an action to send a topic to the Azure Service Bus, accessed the Sitecore Content Hub from the content of the topic received by Microsoft Azure, and then executed the necessary processing externally (in this case, machine translation). The topic content received by Microsoft Azure is accessed by Sitecore Content Hub, and the necessary processing is performed externally (in this case, machine translation).
Although scripts and other methods are available for processing with triggers, it is easier to implement system integration by using a mechanism such as Logic App.