
This article explains how to place a button on your Sitecore Content Hub page to execute a script. It includes steps to create a script for routine tasks, specifically for automatically generating a public link, and how to set up the button.
Register Scripts
In this case, we will use a very simple script that automatically creates a public link on the asset detail page. Normally, this would require two steps: clicking the "Publish" button and then creating the link, but since the script automatically creates the link, it can be completed with a single click.
The sample source code is as follows
C#
using Stylelabs.M.Sdk;

var entityId = Context.TargetId;

MClient.Logger.Info($"Creating public link for asset {entityId}.");

var publicLink = await MClient.EntityFactory.CreateAsync(Constants.PublicLink.DefinitionName).ConfigureAwait(false);
publicLink.SetPropertyValue(Constants.PublicLink.Resource, "preview");

// Link the public link to the asset
//var assetTopublicLinkRelation = publicLink.GetRelation(Constants.PublicLink.Relations.AssetToPublicLink, RelationRole.Child);
var assetTopublicLinkRelation = publicLink.GetRelation<IChildRelation>(Constants.PublicLink.AssetToPublicLink);
assetTopublicLinkRelation.SetIds(new long[] { entityId.Value });

// Save the public link
long publicLinkId = await MClient.Entities.SaveAsync(publicLink);

MClient.Logger.Info($"Public Link {publicLinkId} created.");
The procedure is as follows
- Open Scripts in Administration
- Press the +Script button to add a script.
- Create a script by specifying a name and selecting an action for the type

Open the created script, specify the script to be the source code, and execute the build. Confirm that the build does not produce any errors, and then publish the script.

Then check to see if the script is enabled.

Create Action
Then create an action to execute the script.
- Open by selecting Actions in the admin screen
- Click New Action to start registering actions
- Enter a name for the script
- In the "Format" field, select Action Script, and in the "Script" field on the bottom left, select the script you just registered.
- Click Save to complete registration of the action

In summary, we will proceed as shown in the following image.

Place a button on the page
Edit Page
Assign the created action to the page where you want to use it. In this case, we will add a button to the Asset Details page, which is the page where assets are displayed, to automatically create a public link when the user clicks the button.
- Open page
- Specify the page you want to change, this time using the asset details
- Enable Entity Operation Customization
- Select Edit from the Entity Operations menu
- Click Add Operation and specify the External action
- Change icons and labels to those related to the action
- Specify as action the action to which the script you have just created is assigned
- Save and Close
With the above work, a script is now set to run with the buttons specified on the page.

Confirmation of operation
The following steps will be taken to verify the operation with respect to the above page changes.
- Open any asset
- Check the public link against the asset (easy to see if it is empty)
- Click the button
- After a while, a public link is created
Thus, the test to place the button and run the script is now complete.

Multiple items are processed together.
For the above process, this button is placed for editing a single asset. By selecting multiple assets for this process, batch processing can be performed efficiently.
Edit the Asset Selection page
In this article, we will proceed with a procedure that allows batch processing on pages displaying assets.
- From the Administration page, select Pages.
- Edit the Assets page, this time to select the Assets List page
- Select a selection in the header zone of the Assets page and click Edit
- Select Operations, as multiple tabs will appear
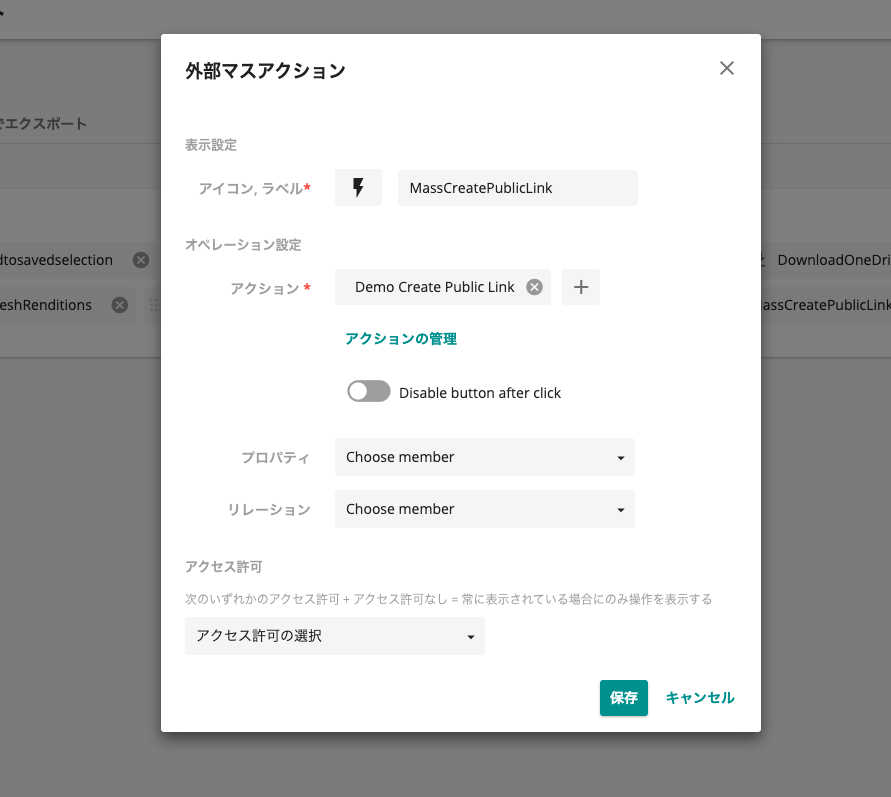
- Click Add Operation and select the External Mass Action item
- Set the icon and item name, and specify the same action as before for the action.

Please refer to the following image for the registration procedure.

Confirmation of operation
To check the operation, open the page with the list of assets you have set up this time and select the items.
- On the Assets page, select multiple assets
- On the Assets page, select multiple assets
- Click on the icon added to the menu item in the upper right corner Confirm that the public links have been added to all the selected items. This allows you to process all items at once, instead of selecting them individually.

Summary
In this case, we created a script that automatically creates a public link as part of the process of the script we created. By assigning this script to the asset details page, we were able to automatically create a public link for the asset. For example, if you have a specific size that is frequently used on the Web, you can automatically create multiple public links with the push of a button. In addition, the same script can now be used for batch processing. As you can see, this makes it relatively easy to add a process to create public links for multiple assets at once.